


There are several reasons why I chose to make this cake for my birthday:
-It’s a Momofuku Milk Bar cake. Which means that there a about 275 components to make (totally not exaggerating here) before you even start assembling the thing. And that, my friends, is my idea of fun. I also happen to love the method of assembling these cakes.
-Carrot cake just seemed very appropriate for a spring birthday.
–Liquid cheesecake. Enough said.
-The idea of a graham cracker flavored frosting completely intrigued me.


Please don’t get intimidated by the length of this recipe, though. It’s really not that difficult, and since everything can be made in advance you can really spread the work out a lot. I was planning on having my cake on a Sunday. The Monday before, I made the milk crumb. I made the liquid cheesecake on Tuesday, baked the cake on Wednesday, and made the graham crust and frosting on Thursday. Then I assembled and froze the cake on Friday, and took the cake out of the cake ring and transferred it to the fridge on Saturday night.
This is the third Milk Bar cake that I’ve made (I still need to get the other ones on the blog, especially the birthday layer cake that I made last summer), and this one is by far my favorite of them. I didn’t find it overly sweet, like some of their cakes can be, and the flavors just went so well together.

Notes:
-You only need half the graham crust recipe for the frosting. You can make half a recipe, but I made the whole thing and froze half to use in an ice cream I plan to make next week. You also only half of the milk crumb recipe, but the leftovers are great for snacking on. Or you can use them in Blueberry & Cream Cookies.
-I am going to type out the recipe in the order that I made it, but you can obviously do it in whatever order you’d like.
-After the recipe are photos of the cake being put together, if you would like to see a visual of the assembly (they’re not perfect—I had to take them at the same time I was assembling it—but it should give you an idea).
-You will need a quarter sheet pan, a 6-inch cake ring, and 2 (3″x20″) acetate strips.
Carrot Layer Cake
Milk Crumb
40 g (1/2 cup) milk powder
40 g (1/4 cup) all-purpose flour
12 g (2 tablespoons) cornstarch
25 g (2 tablespoons) granulated sugar
2 g (1/2 teaspoon) kosher salt
55 g (4 tablespoons, 1/2 stick) butter, melted
20 g (1/4 cup) milk powder
90 g (3 ounces) white chocolate
1. Preheat oven to 250°F.
2. Combine the 40 g (1/2 cup) milk powder, the flour, cornstarch, sugar, and salt in a medium bowl. Toss with your hands to mix. Add the melted butter and toss, using a spatula, until the mixture starts to come together and form small clusters.
3. Spread the clusters on a sheet pan lined with parchment paper, and bake for 20 minutes. Remove from oven and cool completely.
4. Crumble any crumb clusters that are larger than 1/2 inch in diameter, and put crumbs in a medium bowl. Add the 20 g (1/4 cup) milk powder and toss together until it is evenly distributed throughout the mixture.
5. Melt the white chocolate in a heatproof bowl set over a pot of simmering water (being VERY careful not to let any water touch the chocolate). Pour the melted white chocolate over the crumbs and toss until your clusters are completely coated. Continue tossing them every 5 minutes until the white chocolate hardens and the clusters are no longer sticky.
The crumbs can be stored in an airtight container in the fridge or freezer for up to 1 month.
*Makes about 260 g (2 1/4 cups)
Liquid Cheesecake
225 g (8 ounces) cream cheese
150 g (3/4 cup) granulated sugar
6 g (1 tablespoon) cornstarch
2 g (1/2 teaspoon) kosher salt
25 g (2 tablespoons) whole milk
1 large egg
1. Preheat oven to 300°F.
2. Place the cream cheese in the bowl of a stand mixer fitted with the paddle attachment and mix on low speed for 2 minutes. Scrape down the sides of the bowl with a spatula. Add the sugar and mix for 1 to 2 minutes, until the sugar is completely incorporated. Scrape down the sides of the bowl.
3. Whisk together the cornstarch and salt in a medium bowl. Whisk in the milk in a slow, steady stream. Whisk in the egg until everything is thoroughly combined.
4. With the mixer on medium-low speed, stream in the egg mixture. Paddle for 3 to 4 minutes, until the mixture is smooth and loose. Scrape down the sides of the bowl.
5. Line the bottom and sides of a 6″x6″ baking pan with plastic wrap (I used a 6″ round Pyrex, and had to bake it a bit longer, but it worked fine). Pour the cheesecake batter into the pan, put the pan in the oven, and bake for 15 minutes. Gently shake the pan. The cheesecake should be firmer and more set at the edges, but still jiggly and loose in the center. If the cheesecake is jiggly all over, cake for 5 minute intervals until it is done. If the cheesecake rises more than 1/4 inch or begins to brown, take it out of the oven immediately. Cool completely before using.
The cheesecake can be stored in an airtight container in the fridge for up to 1 week.
Makes about 325 g ( 1 1/2 cups)
Carrot Cake
115 g (8 tablespoons, 1 stick) unsalted butter, at room temperature
120 g (1/2 cup tightly packed) light brown sugar
100 g (1/2 cup) granulated sugar
2 large eggs
40 g (1/4 cup) grapeseed oil
200 g (1 1/4 cups) all-purpose flour
4 g (1 teaspoon) baking powder
1.5 g (1/4 teaspoon) baking soda
1.5 g ( 3/4 teaspoon ground cinnamon
5 g (1 1/4 teaspoons) kosher salt
225 g (2 1/2 cups) shredded peeled carrots (about 2 to 3 medium-sized carrots)
Nonstick cooking spray
1. Preheat oven to 350°F.
2. Combine the butter and both sugars in the bowl of a stand mixer fitted with the paddle attachment, and cream together on medium-high for 2 to 3 minutes. Scrape down the sides of the bowl, add the eggs, and mix on medium-high for 2 to 3 minutes. Scrape down the sides of the bowl.
3. On low speed, stream in the oil. Increase the speed to medium-high and paddle for 4 to 6 minutes, until the mixture is almost white, twice the size of your fluffy butter and sugar mixture, and there are no streaks of fat. Stop the mixer and scrape down the sides of the bowl.
4. On very low speed, add the flour, baking powder, baking soda, cinnamon, and salt. Mix for 45 to 60 seconds, just until the batter comes together and all the dry ingredients have been incorporated. Scrape down the sides of the bowl.
5. Remove the bowl from the mixer, dump in the shredded carrots, and fold them into the batter with a spatula.
6. Spray a quarter sheet pan with nonstick spray and line with parchment paper. Using a spatula, spread the cake into an even layer in the pan.
7. Bake the cake for 25 to 30 minutes. At 25 minutes, gently poke the edge of the cake with your finger. The cake should bounce back slightly and the center should no longer be jiggly. Bake for another 3 to 5 minutes if necessary.
8. Remover the cake from the oven and cool completely in the pan on a wire rack (or place it in the fridge or freezer to cool quickly).
The cooled cake can be stored in the fridge, wrapped in plastic wrap, for up to 5 days.
Makes 1 quarter sheet pan cake
Graham Frosting
Graham Crust:
190 g (1 1/2 cups) graham cracker crumbs
20 g (1/4 cup) milk powder
25 g (2 tablespoons) granulated sugar
3 g (3/4 teaspoon) kosher salt
55 g (4 tablespoons, 1/2 stick) unsalted butter, melted (plus additional if needed)
55 g (1/4 cup) heavy cream
1. Toss the graham crumbs, milk powder, sugar, and salt with your hands in a medium bowl until ingredients are evenly distributed.
2. Whisk together the butter and heavy cream. Add to the dry ingredients and toss well, until evenly distributed. the mixture should hold its shape if squeezed tightly in your hand. If it’s not moist enough to do so, melt an additional 14 to 25 g (1 to 1 1/2 tablespoons) butter and mix it in.
Use immediately, or store in an airtight container for 1 week at room temperature or 1 month in the fridge of freezer.
Makes about 340 g (2 cups)
Graham Frosting:
1/2 recipe Graham Crust (above)
85 g (1/3 cup) whole milk
2 g (1/2 teaspoon) kosher salt
85 g (6 tablespoons) unsalted butter, at room temperature
15 g (1 tablespoon tightly packed) light brown sugar
10 g (1 tablespoon) confectioners’ sugar
.5 g (1/2 teaspoon) ground cinnamon
.5 g (1/8 teaspoon) kosher salt
1. Combine the graham crust, milk, and salt in a blender, and pure until COMPLETELY smooth, 1 to 3 minutes depending on your blender.
2. Combine the butter, sugars, cinnamon, and salt in the bowl of a stand mixer fitted with the paddle attachment, and cream together on medium-high speed for 2 to 3 minutes, until fluffy. Scrape down the sides of the bowl.
3. On low speed, mix in the contents of the blender. After 1 minute, turn the mixer up to medium-high and beat for another 2 minutes. Scrape down the sides of the bowl.If the mixture is not a uniform pale tan, beat for another minute or so at medium-high speed, and scrape down the bowl again.
Use immediately, or store in an airtight container in the fridge for up to 1 week.
Makes about 230 g (1 cup)
Assembling the Carrot Layer Cake
1 recipe Carrot Cake (above)
Whole milk
1 recipe Liquid Cheesecake (above)
1/2 recipe Milk Crumb (above)
1 recipe Graham Frosting
1 (6″ by 3″ cake ring)
2 (3″ by 20″) acetate strips
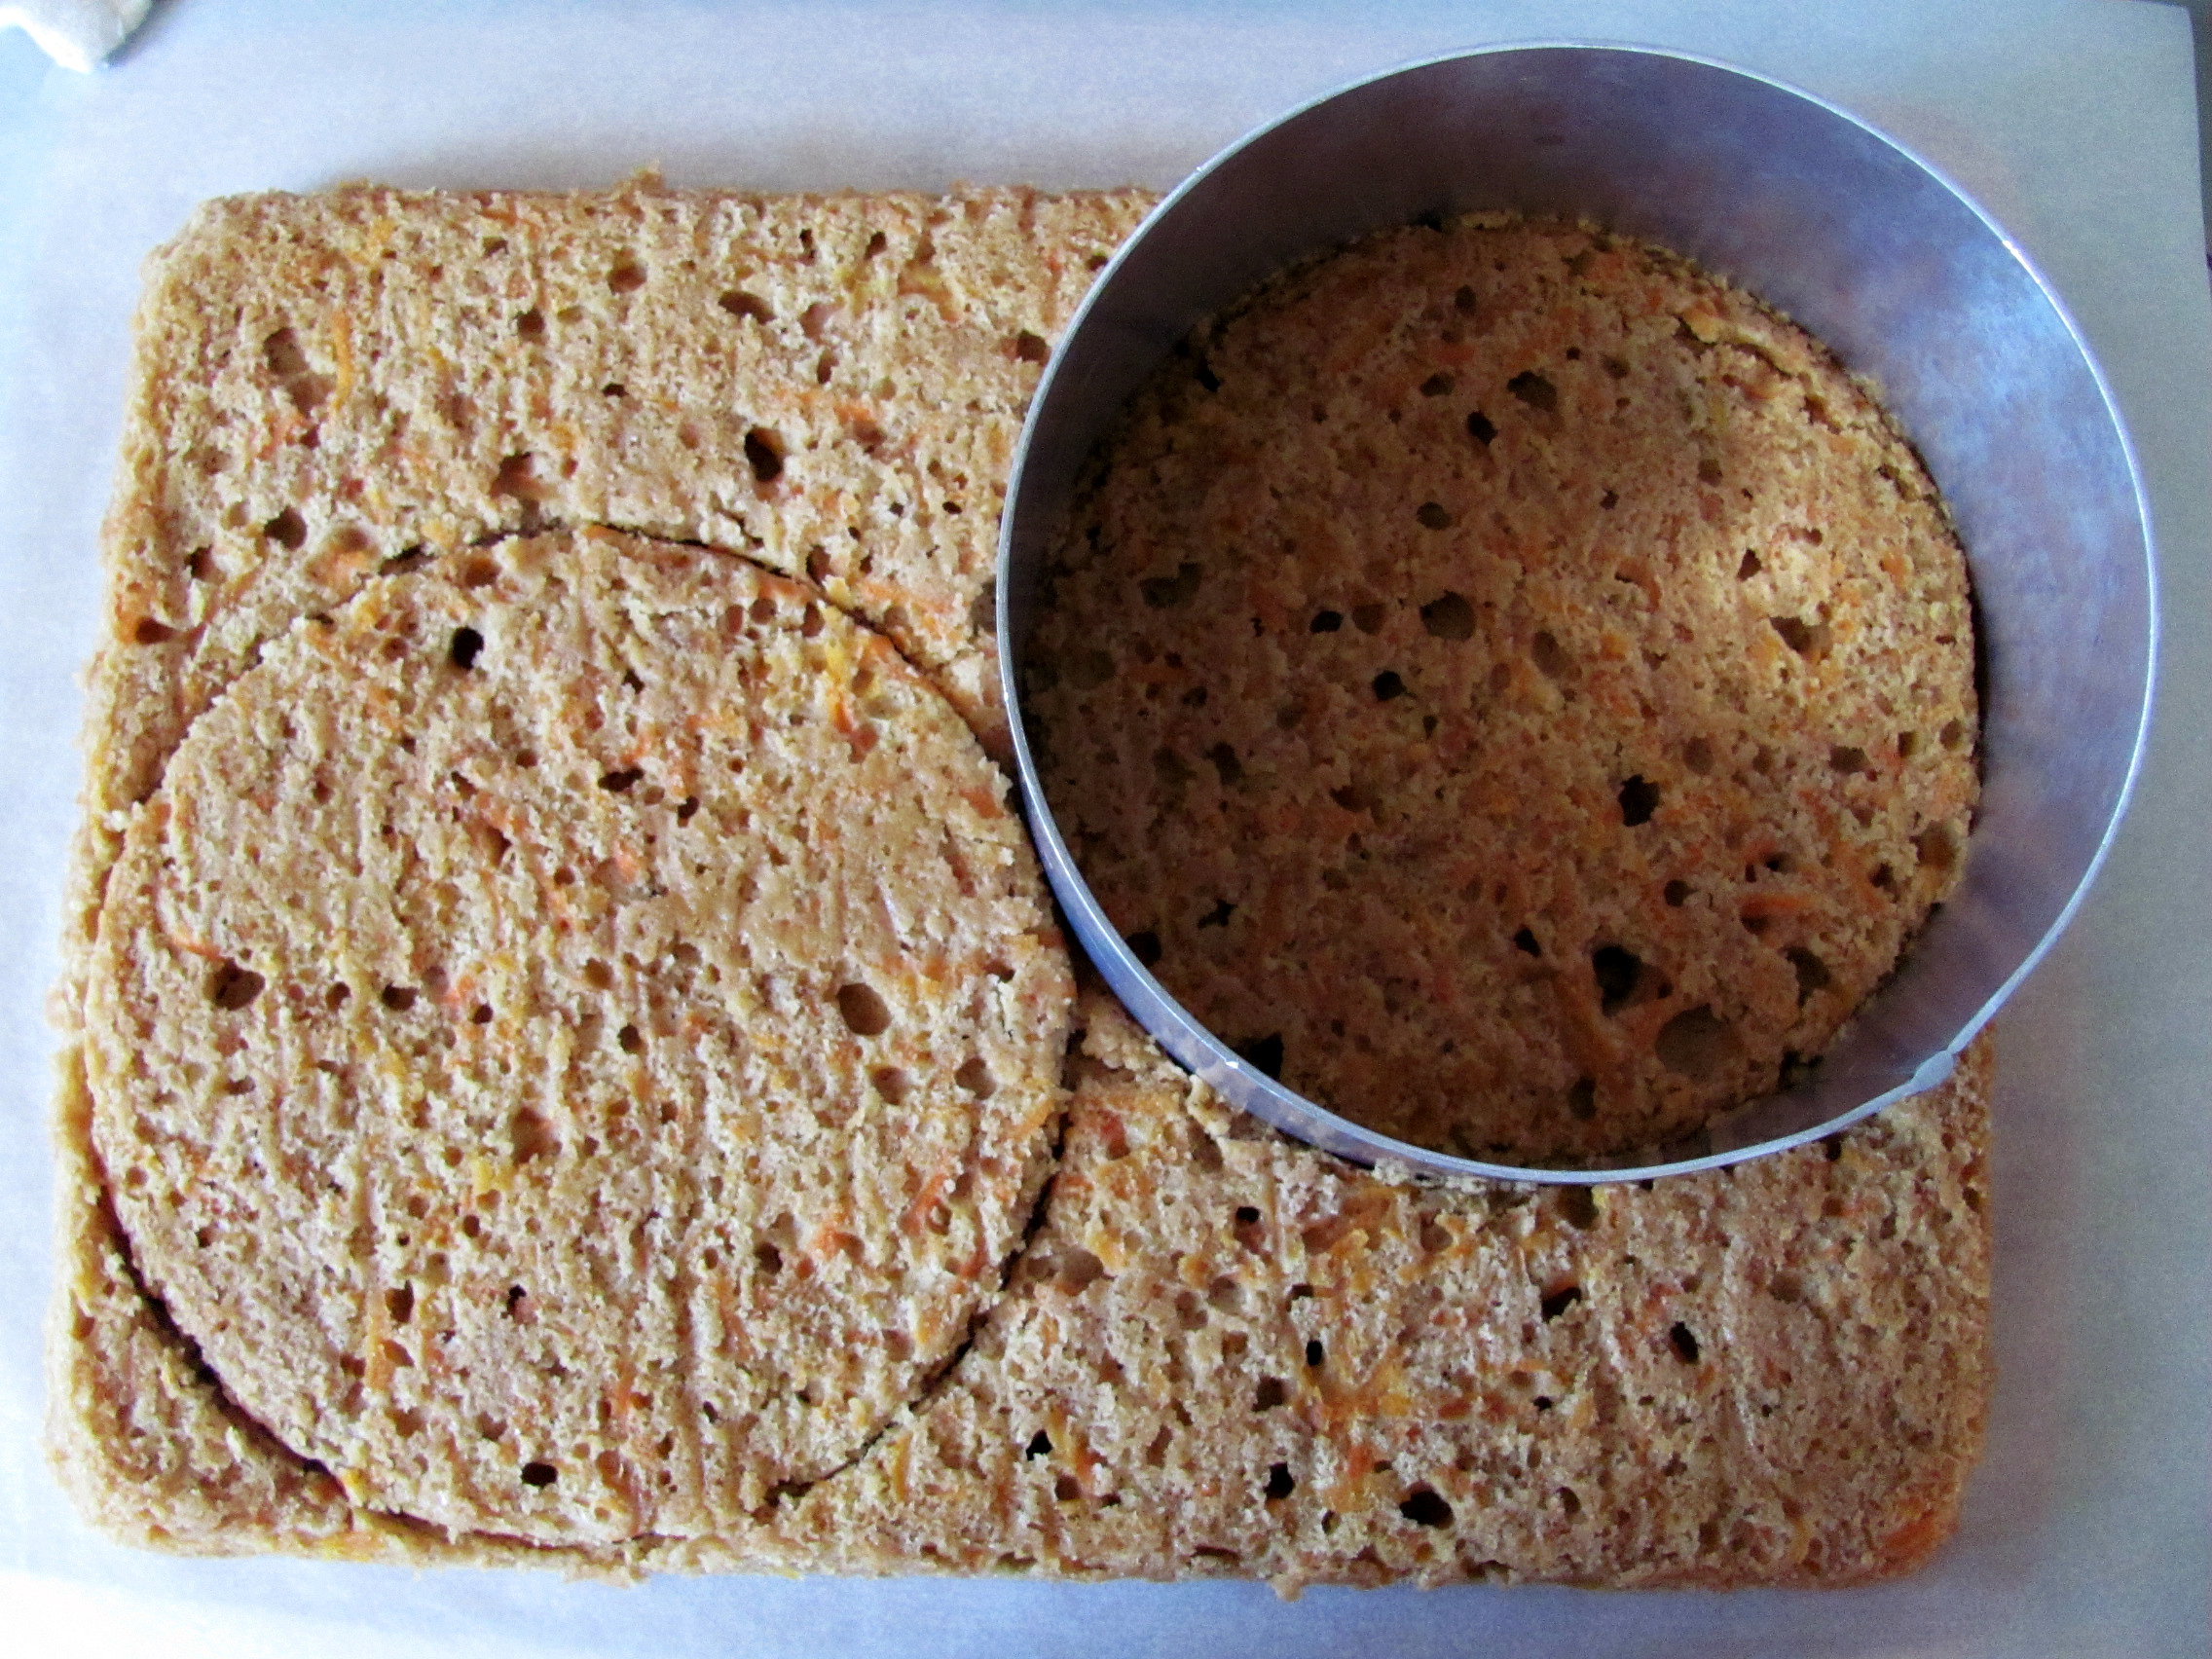
1. Place a piece of parchment paper on the counter. Invert the cake onto it, and peel the parchment from the bottom of the cake (you may need to run a knife around the cake before releasing it from the pan). Use the cake ring to stamp out 2 circles from the cake (as if you were using a giant cookie cutter; see photo below). These are your top 2 cake layers. The remaining cake scraps will be your bottom layer.
2. Clean the cake ring and place it in the center of a sheet pan or cutting board lined with a clean piece of parchment paper. Use 1 acetate strip to line the inside of the cake ring.
3. Put the cake scraps inside the ring and use the back of your hand to push them down into an even layer. Don’t worry if it doesn’t look nice—once it’s covered up no one will ever know.
4. Using a pastry brush, brush the cake layer with a good dose of milk (not too much, or it will leak out of the bottom of the cake).
5. Use the back of a spoon to spread half the liquid cheesecake in an even layer over the cake.
6. Sprinkle 1/3 of the milk crumbs over the cheesecake. Tap them gently with the back of your hand to anchor them in place.
7. Use the back of a spoon to spread 1/3 of the graham frosting as evenly as possible over the crumbs (I found it really hard to spread frosting over the cheesecake and crumbs, so I just dolloped it evenly over them).
8. With your index finger, gently tuck the second acetate strip between the cake ring and the top 1/4 inch of the first strip of acetate (see photo below), so that you have a clear ring of acetate 5 to 6 inches tall. Set another cake round on top of the frosting, and repeat the process from the first layer (the rest of the cheesecake, half of the remaining milk crumbs, and half of the remaining frosting).
9. Top with the last cake round. Cover the top of the cake with the remaining frosting, smoothing it out (or swirling it, if you prefer). Garnish with the remaining milk crumbs, gently nestling them into the frosting.
10. Cover with plastic wrap, transfer the sheet pan or cutting board to the freezer, and freeze for a minimum of 12 hours to set the cake and filling. You can keep the cake in the freezer like this for up to 2 weeks.
11. At least 3 hours before you are ready to serve the cake, remove it from the freezer, and using your fingers and thumbs (pushing against the bottom of the cake), pop the cake out of the cake ring. Gently peel off the acetate, and transfer the cake to a cake stand or serving plate. Allow the cake to defrost in the fridge for at least 3 hours.
Cake can be kept, wrapped well in plastic, for up to 5 days.
*Recipe from Momofuku Milk Bar, by Christina Tosi


LOOK AT HOW AMAZING YOUR CAKE IS! i love that we are very similar in the way that we see recipes involving 293 things and we LOVE it. 🙂 It’s my idea of a good time also, but you know that. Yours looks so beautiful! I’m so happy you chose to make this one, because it’s perfect for spring and i loved this one when i made it. Still one of my favorite things from the book.
The two of us are definitely weird when it comes to making baked goods 😉
This cake was definitely great! And next week I hope to make something else from the book that uses a couple of components from this cake–the cheesecake ice cream. I hope it works out, since I’ve never made ice cream with gelatin in it before.
Dear Faygie – I am soooo impressed with what you do. Needless to say, I will not cook or bake like you, but I love to see all your good works. You are wonderful! luv ya! grandma lynn
Thank you! 🙂
Happy Birthday! Best wishes for a year of happiness, good health, success and prosperity, and many more!
Where do you get Chalav Yisroel milk powder? Thx.
I bought one container at Glatt Mart a couple years ago but I haven’t seen it since, so my sister-in-law brought me a few from NY.
Happy Birthday! You know you’re a food blogger when….you bake your own bday cake 😉 This sounds awesome. Carrot cake is one of my faves and I believe this takes the regular old carrot cake OVER THE TOP! Yum!!
Thanks! I’m a firm believer in making my own birthday cake–I’m guaranteed to get exactly what I want! And it combines my love of baking and my control freak tendencies perfectly 😉
If you love carrot cake, you should definitely try this one! The liquid cheesecake was SO GOOD with the carrot cake layers. If nothing else, make the liquid cheesecake and eat it with a spoon. That stuff is amazing.
Pingback: Birthday Layer Cake {Better Late Than Never} | Life Tastes Good
Pingback: Victoria Sponge Cake | Life Tastes Good
The cake looks nice 🙂
Thanks for the recipe…
Pingback: Chocolate Chip Layer Cake with Cheesecake Filling & Coffee Frosting {For Tova’s 3rd Birthday} | Life Tastes Good
Pingback: Carrot Cake by Christina Tosi | RecipeBetaTester
Pingback: Momofuku Carrot Cake » Sweet Rehab
Pingback: Momofuku Milk Bar Carrot Cake » Sweet Rehab
i will try to do this for my loveones:) looks so yummy… thanks for sharing it, simply amazing